There are many advantages to swapping an early Bronco Dana 44
into the front of a Wrangler YJ. The Dana 44 has larger u-joints,
bigger ring and pinion, larger axle shafts (30 spline), beefy
internal hubs, 5 on 5.5" wheel bolt pattern, and good pinion
placement. The Dana 44 also has more ring and pinion options
than the reverse cut Dana 30 in the YJ. Lockers are generally
cheaper for the Dana 44 since it is such a common axle.
The pinion placement is a big advantage of the early Bronco Dana
44 over other Dana 44s because it is set up for a drivers drop
transfer case. The pinion lines up with the stock YJ NP207 or
NP231 transfer case. There is no need to swap in a different
transfer case as you would if you were to use a Scout Dana 44.
The housing is aligned in such a way that there is plenty of
room for a spring perch, but it does not interfere with the
engine oil pan.
A disadvantage of the early Bronco front Dana 44 is it uses a
smaller axle shaft u-joint than later Dana 44s used in other vehicles,
they are not too common, and there is more prep work to swap one in
than there is for other front Dana 44s.
Preparation
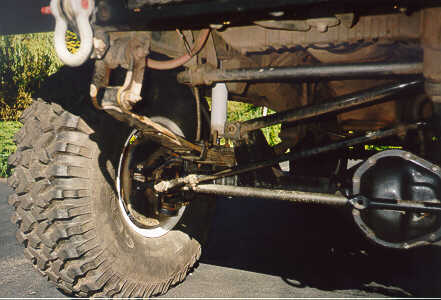
The job of removing unnecessary brackets and mounts was started
after the axle was torn down and all the parts were filed neatly away.
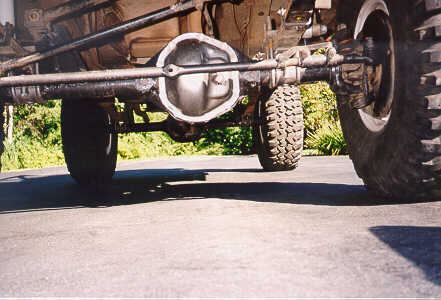
The early Bronco Dana 44 uses a 2 link coil suspension up front and
there are large radius arm mounts welded to the axle housing. Removing
all the mounts and brackets took 6-8 hours and at least eight 3"
cutting wheels (used my dad's electric grinder).
 The radius arm
mounts are huge chunks of steel welded onto the tubes and they
take a LOT of persuasion to remove, but it can be done with enough
time and effort. The best technique appeared to be to cut into them
about 3/8" back from each weld (top and bottom).
Once one of the cuts is through, pound the ^#%$@ out of it until it
comes off, then grind away the remaining material with a carbide
bit.
The radius arm
mounts are huge chunks of steel welded onto the tubes and they
take a LOT of persuasion to remove, but it can be done with enough
time and effort. The best technique appeared to be to cut into them
about 3/8" back from each weld (top and bottom).
Once one of the cuts is through, pound the ^#%$@ out of it until it
comes off, then grind away the remaining material with a carbide
bit.
Gears and Bearings
A local guy set up my front gears, installed new ball joints in the
knuckles, and installed the knuckles onto the axle. He also packed
my new Timken wheel bearings with grease and replaced all axle seals.
The carrier, pinion, and front spindle bearings were also
replaced. When I picked up the axles I was told that the front end had
a factory limited slip in it. Never having seen one before,
I hadn't even noticed. This stroke of luck almost made up
for the new gears the rear end needed...
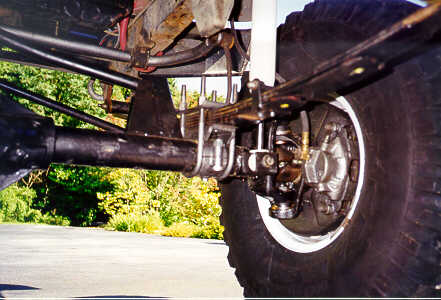
Spring Perches
Rather than fabbing up spring perches, I bought two pairs of adjustable
clamp-type perches from Lou Feger's Racing (p/n 20232-1) in the US.
This let me get my rear pinion angle and front caster fine-tuned after
the axles went into the Jeep. Since these perches are made for a 3"
diameter axle tube, I had to make some shims out of 0.120" 3" steel
tubing for the front end, which has a tube diameter of 2.75". Once the
brackets were made, my friend Larry very kindly helped out by welding
them onto the axle housings for me.
The big concern with the perches and axle is that the front diff
was 3-4" closer to center than the YJ Dana 30, so I couldn't be
sure if there would be a conflict with it and the oilpan. After
measuring and test fitting, it was found that the oil pan would
not be a problem. The driver side spring perch is not integrated
with the diff housing so, setting the pinion angle is relatively
easy.
Brackets
 This is where the real design work was. Brackets were needed to
be able to mount these axles of mine into the YJ, and they all had
to be custom made. So I did some drawings, bought some steel, and
went to work. A band saw, drill press, belt sander, and my dad's
trusty grinder were all the tools needed to make shock mounts and
a track bar bracket. The steel was all .120" hot-rolled square
tubing and plate.
This is where the real design work was. Brackets were needed to
be able to mount these axles of mine into the YJ, and they all had
to be custom made. So I did some drawings, bought some steel, and
went to work. A band saw, drill press, belt sander, and my dad's
trusty grinder were all the tools needed to make shock mounts and
a track bar bracket. The steel was all .120" hot-rolled square
tubing and plate.
Since this was all custom, I made the shock brackets such that the
shocks would not hang down below the axle tubes. This was a compromise
between ground clearance and shock travel. I chose clearance, knowing
that I could raise the frame mounts if necessary later.
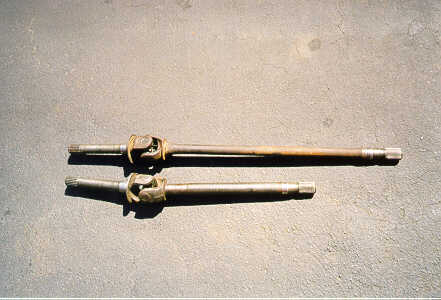
Axle Shafts
There are two common types of regular duty Dana 44 shafts, those with
small u-joints and those with large ones and I got one of each.
The stock shafts for the early Bronco Dana 44 have small u-joints,
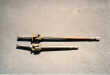 but the short one (driver's side) can be directly replaced with a shaft
from an F150. The F150 shaft has has the large u-joint, and somebody
had already done that with my front end before I bought it. Cool!
Unfortunately there's no such easy upgrade for the long side shaft,
so I'll just have to keep an eye on it. One option to upgrade the
long side is to cut down and respline a F150 long side shaft, but
that's more ca$h.
but the short one (driver's side) can be directly replaced with a shaft
from an F150. The F150 shaft has has the large u-joint, and somebody
had already done that with my front end before I bought it. Cool!
Unfortunately there's no such easy upgrade for the long side shaft,
so I'll just have to keep an eye on it. One option to upgrade the
long side is to cut down and respline a F150 long side shaft, but
that's more ca$h.
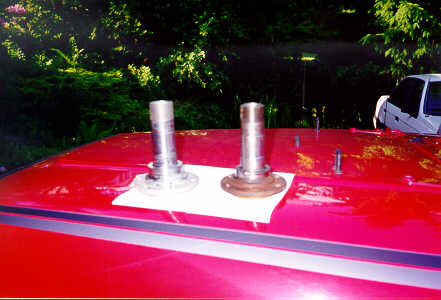
Disc Brakes
All early Broncos came with drum brakes from the factory except for
the last two years of production in '76 and '77. My '73 front axle had
drums on it when I bought it, and there was no way I was going to keep
them. A front disc brake swap was in order and I found an excellent
article on the web on
disc brake swaps for early Broncos.
It is almost a bolt-on swap: spindles,
caliper mounts, and calipers from a '76 Chevy Blazer plus hub/rotor
assemblies from a '78 Ford F150 or Bronco and the original Bronco
knuckles. It is a real mix-n-match affair, but it worked like
a hot damn. It gave me nice big 11" discs for stopping 35" tires.
|
Pearl of wisdom: Get really cruddy, rusted calipers at wrecking yards
for next to nothing and use them as cores to purchase rebuilt
calipers.
.
|
The only "rework" required is to grind away some material on the
calipers, but that was pretty easy. This method proved a lot cheaper
(for me) than swapping in parts from a '76-'77 Bronco or F150 D44,
which was the other option. I bought new hub/rotor assemblies and
and brake pads and I bought rebuilt calipers. Everything else was
purchased at local wrecking yards and cleaned up, including the
caliper mounting bolts and banjo bolts, which proved surprisingly
difficult to find.
The disc brake swap instructions say that you're supposed
to keep the hub body in place with a flat washer bolted to the end
of the stub shaft instead of using the c-clip that comes with the
hub. This is necessary because the Chevy spindle is slightly
longer than the Bronco one. The passenger side worked out fine
that way, but it turned out that the F150 shaft on the driver
side has a slightly longer stub shaft, so I was able to get the
c-clip on there and avoid the washer thing. The disc brake swap
lets you keep the internal type locking hubs, which are said to
be stronger than the external type used on CJs and Scouts. I went
with a pair of Warn Premium hubs.
In order to use my stock YJ steering box and drag link, it worked out
best to use a YJ tie rod. The Bronco tie rod I had was bent, and it's
drag link connection was way too close to center to work properly.
I bought a YJ tie rod at the local wrecker and had it shortened 4"
(at the adjuster) and re-threaded. The tapered ends of the YJ tie
rod ends were smaller than the tapered holes in the Bronco
knuckles, so I had a machinist friend make two tapered bushings to
fit in between.
The tapered holes on the early Bronco knuckles are about 1" further
away from the balljoints than the YJ knuckle, so I've lost a little
turning radius. It isn't enough that I really notice, and the
knuckles didn't really have the space to drill new holes. Having
the tie rod further away is probably necessary in order for it to
clear the diff cover at full lock. An option to regain some turning
radius might be to use a longer pitman arm.
The front was quite a bit more work than the rear, which makes sense
in retrospect. There were many other details to my swap such as
shock selection, drive shaft length, and clearance because
of the spring over axle swap I did at the same time. These would
not normally be issues if there were no changes to suspension.
Even if you do not change the suspension, you will have to do
something about brake hoses, u-bolts, and u-bolt plates. The
changes I made are are discussed in the spring over axle article.