Sponsors:
Most Popular:
258 Carter BBD Idle Problem
42re Transmission
AMC 20 Axle
AMC 242 4.0l Engine
AMC 258 I6 Engine
AMC 304 V8 Engine
AX 15 Transmission
AX 5 Transmission
Axle Upgrades
CJ-5
CJ-7
Dana 30 Axle
Dana 44 Axle
Front Dana 44 Axle Swap
Jeep CJ Gauge
Jeep Engine Upgrades
Jeep Tires
Jeep Transmission
Rear Dana 44 Axle Swap
Transmission Conversion
|
On-Board Air for Jeeps Using the York Compressor
One of the most time-honored rituals in four-wheeling is the airing
down of your tires before you hit the trail. The problem is that
you then need to refill them to street pressure before you hit the
highway. The obvious solution is to carry an air tank or air compressor
with you on the trail. There are several ways to do this:
- Carry a pre-filled air tank with you that has enough capacity to
fill all four tires. This gives you a limited air supply, and
doesn't allow you to help out your neighbors who need air.
- Carry a $15 compressor powered by your lighter jack. This is cheap
and gives you unlimited air, but you have to wait forever. I
have such a compressor. It's great for bikes and balls, but
it only puts about 1 psi per minute into my 225/75R15's.
- If you have
ARB air lockers, you can use the small compressor that powers
those to fill your tires. It's a whole lot better than the above
option, but it's still slow, noisy, only puts out about
90 psi, and costs $200.
- Companies like Curry and Ready-Air sell electric compressors that
you mount in your engine compartment. These often are setup to
fill auxiliary air tanks mounted somewhere on the vehicle.
The Quick Air 2 boasts 2.2 cfm at 105 psi and runs about
$250.
- The York-style A/C compressors used by AMC, Ford, and Volvo in the
'70's can be used as engine-driven air compressors. That's the
setup that I'm using on my YJ. Not only will it fill tires,
but it also keeps up with most smaller air tools.
The Tank
You really should have a tank for any good onboard air setup. This
ensures that you still have air if your engine dies, and it lets you
run things like air tools that suck more volume than your compressor
can put out.
Some people weld shut the ends of their tube bumpers, nerf bars, or
roll cages and tap a hole to mount the air fittings. For example,
a 36" long, 3" diameter tube will hold 1.1 gallons of air. This is
a great idea, if you have such things on your vehicle. I don't (yet).
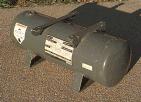
I opted for a used 6"x19", 2-gallon tank from an old portable air
compressor rated at 125 psi. I picked this up at a local air compressor
repair shop for $30. It even came with the necessary brackets already
welded onto it, as well as two threaded holes containing a drain plug,
quick disconnect fitting, and 150 psi pop-off safety valve. I just had
to drill the mounting holes and cut off any brackets I didn't need.
The next trick is tank placement. Some people put the tank inside
the vehicle, but then you have to run the air lines through the
firewall to reach the compressor. It's also a safety hazard if the
tank gets over-pressurized or dented and explodes. In a small vehicle
like my YJ, inside space is at a premium, so I didn't want to waste
it with a permanently-mounted air tank.
That left three good spots that I could find on my YJ:
- Just behind and to the right (passenger side) of the radiator,
in front of the fender well.
- Behind the right fender well, underneath the battery tray.
- Under the body tub, above, in front of, and parallel to the
rear axle.
 Each spot is a different shape. The best choice depends on the shape
of your tank and the amount of other stuff in your engine compartment.
I chose to mount my tank by the rear axle. The maximum diameter of
a tank in this position is 6" if you want to avoid hitting it with
your pinion yoke.
Each spot is a different shape. The best choice depends on the shape
of your tank and the amount of other stuff in your engine compartment.
I chose to mount my tank by the rear axle. The maximum diameter of
a tank in this position is 6" if you want to avoid hitting it with
your pinion yoke.
When mounting your tank, it's important to have an outlet at the
lowest point on the tank so you can drain moisture from it periodically.
Regardless of what filters you have on the line, unless you live in a
zero-humidity environment, water will condense on the inside of
the tank when it depressurizes.
 When I mounted my tank, I used a single hole on the bottom "side" of
the tank for both input and output. I simply used a four-way cross
connector that had the top connected to the bottom of the tank, the
hose to the compressor coming out one side of the cross, a drain plug
on the bottom of the cross, and a quick-disconnect fitting on the other
side. The quick disconnect is a bit more difficult to reach than I'd
originally envisioned, so I may drill a hole in my tub and move it
inside the cab someday. To keep the inside of the quick disconnect
clean, I capped off a male disconnect fitting and keep it plugged into
the female end when not in use. I zip-tied the hose to the brake and
fuel lines running along the inside of the frame rail and up into the
engine compartment. The hose then ran along a lip on the bottom of the
firewall just above the bellhousing (I drilled a hole in this ledge and
zip-tied the hose to it to ensure it wouldn't fall off and lie on
anything hot. I coiled the extra foot or two of hose up under the
battery tray, and then ran the end of it under the alternator to the
front of the passenger fenderwell where the rest of the air fittings
were located. This requires about 12' of hose; I picked up 15' of 1/4"
hose for $7 from the local surplus center.
When I mounted my tank, I used a single hole on the bottom "side" of
the tank for both input and output. I simply used a four-way cross
connector that had the top connected to the bottom of the tank, the
hose to the compressor coming out one side of the cross, a drain plug
on the bottom of the cross, and a quick-disconnect fitting on the other
side. The quick disconnect is a bit more difficult to reach than I'd
originally envisioned, so I may drill a hole in my tub and move it
inside the cab someday. To keep the inside of the quick disconnect
clean, I capped off a male disconnect fitting and keep it plugged into
the female end when not in use. I zip-tied the hose to the brake and
fuel lines running along the inside of the frame rail and up into the
engine compartment. The hose then ran along a lip on the bottom of the
firewall just above the bellhousing (I drilled a hole in this ledge and
zip-tied the hose to it to ensure it wouldn't fall off and lie on
anything hot. I coiled the extra foot or two of hose up under the
battery tray, and then ran the end of it under the alternator to the
front of the passenger fenderwell where the rest of the air fittings
were located. This requires about 12' of hose; I picked up 15' of 1/4"
hose for $7 from the local surplus center.
The Compressor
Identification
Most A/C compressors lubricate themselves with the freon that flows
through the A/C system. In order to use these compressors for pumping
air, you need to have an external oiler feeding oil into the intake
hose and a filter to remove the oil from the output hose. Certain
York-style compressors (the big, boxy, vertical kind) used an internal
oil reservoir for lubrication, which makes them ideal for use as
stand-alone air compressors. These compressors were commonly used on
AMCs, Fords, and (I hear) Volvos in the '70's and early '80's.
Therold Enterprises makes
mounting brackets and alternator pulleys to mount an AMC York onto
a current Jeep 4- or 6-cyl engine. The guy I talked to was extremely
friendly and knowledgeable about the differences in the various kinds
of York compressors. He outlined three major differences in the
various types: hose connectors, pulley clearance, and piston stroke
length.
Unless you have gobs of vertical hood clearance, you really want to
get the AMC-style hose connectors, which run horizontally across the
top of the compressor. The Ford-style connectors stick vertically
out of the top of the compressors and then bend over to connect with
the A/C hoses, which adds about 3" to the total height of the unit.
The good news is that these connectors are just screwed into the top
of the compressor, and the two connector styles are interchangeable
on the same compressor. The bad news is that the screw threads on
the connectors are closer together than those on most 3/4" pipe
fittings, so it's nearly impossible to find connectors anywhere but
on another York compressor. At left is a photo of my Ford-style
compressor. The photo shows one Ford-style hose connector and one
AMC-style connector so you can see the difference.
Another difference between the AMC and Ford versions is the pulley.
The AMC pulley is positioned very close (1/2") to the body of the
compressor. The Ford pulley sticks out about two inches away from the
body. This might make a difference in your mounting bracket because
the belt obviously needs to line up evenly with the pulley on the
other end.
The third difference is in the stroke length. There are reportedly
three different stroke lengths, ranging from less than 7" to over 10".
The longer the stroke, the more air the compressor can pump per minute.
This doesn't vary by auto maker, so there are two ways to tell which
length you've got:
- If your compressor still has a metal York (not Motorcraft) ID
tag bolted to the front of it, there will be a number on the
tag that looks like "F2XXY", where:
| XX | Stroke length |
|---|
| | 10 = long |
| | 09 = medium |
| | 07 = short |
| Y | Discharge Direction |
|---|
| | L = left |
| | R = right |
- Take off the clutch and look at the crankshaft.
- Remove the center bolt (1/2" socket)
- Remove the large washer
- Run a 5/8" coarse thread bolt in until it forces the clutch off
- Look at the end of the crankshaft. The end is flat on all
models.
- If the edge of the flat end is beveled, you've
got the short stroke.
- If it's a sharp corner, but with a thin groove for
a retaining clip, you've got the medium stroke.
- If it's a sharp corner without any groove, you've
got the long stroke.
Acquisition
I've seen junk yard prices for old Yorks ranging from $12.50 to
over $50. I had to pay $30 for my Ford model off a late-70's
Fairmont, then shelled out another $20 to get AMC hose connectors
and an idler pulley off an AMC Eagle at a different yard. If you
can, have the yard personnel remove the compressor for you, since
the placement of the mounting bolts makes removing it from the
vehicle yourself a real PITA. When getting the hose connectors,
try to grab a length of hose along with the weird connector. This
will make it easier to connect it to your own custom setup later.
Before you lay down your green, make sure the compressor works. To
check whether it pumps air, plug the outlet hose with your thumb
and then turn the inner portion of the clutch pulley several full
revolutions. If, upon removing your thumb, you can feel the
pressure difference, then it passed the test. Ideally, there
should be no oil pumped out the hose, but a simple inline filter
will fix that problem if it exists. The second test is whether the
electric clutch works. The clutch is what locks the outer portion
of the pulley where the belt runs to the inner portion of the
pulley that's connected to the crankshaft. To check this, ground
the compressor case on your vehicle. Then take the single wire
that should be attached to the compressor and touch it to your
positive battery terminal. You should hear a click as the clutch
engages, and turning the outer portion of the pulley should then
force the inner section to turn and pump air. When current is
removed, the clutch should disengage, and the outer portion of the
pulley should spin freely without moving the inner portion.
Mounting
In order to hold oil, the compressor must be mounted vertically.
The oil check/fill hole on my York is about half way up the left
(as you're facing the pulley) side of the compressor. Remove the
bolt, then put a 90-degree bend in a section of metal coat hanger.
Make sure it's long enough so that the end of the wire touches the
bottom of the oil sump. I've seen oil level recommendations ranging
from 1" to half way up the dipstick. The type of oil used isn't
critical--regular old 10W-30 will work fine. A trigger-type oil
squirter can seems to be the best way to add oil when necessary.
 Mounting the York to an old Jeep with a 258 ci inline-6 should be pretty
easy, since this compressor was available from the factory. Just grab
the OEM brackets from another 258 with A/C and you're good to go.
Mounting it on any other engine requires fabrication of a custom mounting
bracket. Complete mounting brackets for newer Jeep engines are available
for $200+ from Therold Enterprises. If that's too steep for you, they'll
sell you just the back plate for the compressor, with slots drilled for
adjustable mounting bolts, for $12. If you're the do-it-yourself type,
you could also fabricate your own design. Craig Myers has a
good
design for mounting to his '93 YJ 4-cyl that I believe is similar
to what Therold sells. I ended up with (essentially) two 6x6x3/16"
steel plates welded together to form a T. A diagram with mounting
hole measurements is on page 1.
Measurements of the alternator bracket, compressor, and pulleys without
the compressor bracket is on page 2.
Mounting the York to an old Jeep with a 258 ci inline-6 should be pretty
easy, since this compressor was available from the factory. Just grab
the OEM brackets from another 258 with A/C and you're good to go.
Mounting it on any other engine requires fabrication of a custom mounting
bracket. Complete mounting brackets for newer Jeep engines are available
for $200+ from Therold Enterprises. If that's too steep for you, they'll
sell you just the back plate for the compressor, with slots drilled for
adjustable mounting bolts, for $12. If you're the do-it-yourself type,
you could also fabricate your own design. Craig Myers has a
good
design for mounting to his '93 YJ 4-cyl that I believe is similar
to what Therold sells. I ended up with (essentially) two 6x6x3/16"
steel plates welded together to form a T. A diagram with mounting
hole measurements is on page 1.
Measurements of the alternator bracket, compressor, and pulleys without
the compressor bracket is on page 2.
If your engine uses newer serpentine belts, you must somehow rig up a
v-belt pulley to power the compressor's v-belt pulley. Therold sells
a new alternator pulley for newer Jeeps that has both serpentine and
v-belt grooves. This seems to be the route most people take, but their
$40 price tag was a bit steep for me. I wandered around a junk yard
until I found a pulley that would fit between my water pump pulley
and the fan mount. I got one for $5 (I think it was from an
'80-ish Chevy Caprice -- I forget exactly) that had 3 screw holes (my
Jeep has four) and a 7/8" center shaft hole (my Jeep's was 5/8"). I
took it to a local machinist who charged me $15 to narrow the center
hole with a washer and drill a 4-hole bolt pattern to match that of
my Jeep. I considered doing it myself, but a pulley spinning at 4K
rpm will cause nasty vibrations and eventually tear up your water pump
if it's not perfectly centered. My route was a bit more work, but I
saved $20. The result required a 49.5" v-belt. The center of the belt
has at least an inch of play when I push hard, which is more than I'd
like, but a 49" belt just wasn't long enough. An idler pulley may be
in order if belt slippage becomes a problem.
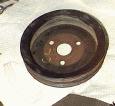
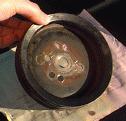
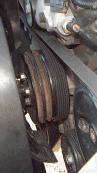
The first picture below shows the pulley as it came off the donor
vehicle. The second picture shows the modifications that the machinist
made to allow mounting to my YJ. The third photo shows it mounted in
place.
If I were doing it again, I might just buy the stuff from Therold rather
than fabbing it myself. Their way uses a $40 pulley plus a $12 plate
that allows the compressor to adjust itself vertically, guaranteeing
a tight belt ($52 total). My set cost $20 for the re-machined pulley
plus $40 for the bracket (got screwed there--he quoted me $25 initially).
This cost $60 total, and I may have to add a sturdy, adjustable idler
pulley to my compressor bracket if the belt turns out to be too loose.
Air Fittings
I chose to mount the hose connectors and stuff on the inside of my front
right wheel well near the factory jack. That location provides easy
access and also keeps everything above the water line should I decide
to ford any rivers.

The input hose on the York compressor needs to run to an air filter.
I used a $4 crankcase filter (Fram part BA3631) that looked like it
would match up well to my intake hose. A foot or so of electrical
tape fastened it to the metal part of the intake hose connector.
If your compressor leaks any oil out through the output hose, you'll
want to install an inline air filter between the compressor and the
rest of the system. This should trap any oil, water, or anything
else that you don't want getting blown into your tank, tires, or tools.
It doesn't look like my compressor has this problem, so I opted to
save $20 and skip the filter.
The output hose from the York (or the filter, if so equipped) needs
run to a check valve that prevents air from the rest of the system
from flowing back into the compressor. If this were allowed to happen,
the compressor would have to work much harder to start up initially.
On the system side of the check valve, I installed a pressure switch.
This switch turns the compressor's clutch on when the pressure in the
system drops to a certain level, and turns it off again when the
pressure climbs to a certain level. Many pressure switches have
preset on and off levels, but I found one at a surplus center for $17
that has variable settings I can adjust myself. The difference between
on and off is preset to about 15-20 psi. I adjusted the turn on
pressure to about 90-95 psi for now, putting the shut off pressure at
just under 110 psi. If you're using this compressor to power your ARB
air lockers, you must keep the pressure between 80 and 105 psi.
Next to the pressure switch, I installed a 160 psi pressure gauge.
Make sure you mount this such that it will be easily visible in less
than optimal lighting without sticking your head down into a running
engine. Mine ended up just rearward of the right headlight, lying
sideways and facing straight up.
Somewhere around here needs to be a pop-off safety valve rated the
same as your wimpiest piece of hardware. In my case, the 125 psi tank
was the limiting factor. If the pressure reaches a certain level, this
valve will pop open to release the extra pressure before something more
critical explodes.
The last piece was a 1/4" NPT quick-disconnect fitting to which I can
attach the air hose of my choosing. I picked up a 25' long 1/4" rubber
air hose at the local surplus center for $7. (The spring-coiled hoses
just don't stretch far enough to reach all four tires.) One end of the
hose needs a male fitting for the quick disconnect, and the other end
needs a female end. Don't forget to get an air chuck to attach the
hose to your tire stems. If you have a tendency to splash water, mud,
or other crud around your engine compartment (or near the rear axle,
where I mounted a second quick disconnect), then you'll want to keep
that stuff out of your air fittings. I got two mail quick disconnect
fittings and capped them off to use as plugs in the female fittings
when I'm not using the air system for more important things.
This whole mess is attached to my fender well with an angle bracket
and a couple bolts.
Electrical Connections
In addition to the pressure switch, you should also have a master
switch somewhere in the battery / pressure switch / clutch circuit
so that your battery doesn't go dead if your tank gets low while the
engine isn't running. A lighted switch run through the firewall to
your dashboard is probably a good idea.
I used a big, lighted SPST rocker switch screwed to an angle bracket
on the bottom of my dash (just under the climate control levers).
Being lighted, it's easy to see at a glance whether it's on or off,
but at night, that bright red light is quite blinding. I recommend
getting a smallish switch whose glow won't ward off oncoming aircraft.
The wire ran from the upper-left-most accessory plug in my under-dash
fuse block to the rocker switch. I used an accessory plug so that the
circuit would be switched by the ignition key; there's obviously no point
in engaging the compressor clutch if the fan belts aren't turning. It
then ran from the switch through the rubber grommet above the accelerator
through which all the other dash wires run into the engine compartment.
Just use a small knife to cut the smallest slit possible in the rubber
grommet that will still allow your wire to pass through. The wire then
ran along the front of the firewall to the passenger side fender well
and then up to the pressure switch. The last leg runs from the pressure
switch to the positive wire running out of the compressor.
Shopping list
The actual list of supplies required will vary from one rig to another,
but this is what I used and what it cost me.
| Item | Cost |
|---|
| Compressor and Tank |
|---|
| York A/C compressor from Ford Fairmont
| $35.00 |
| AMC-style hose connectors for York
| $12.00 |
| Custom mounting bracket for compressor, parts and labor
| $40.33 |
| V-belt water pump pulley from Chevy Caprice, machined to fit '95 YJ
| $20.00 |
| 49.5" V-belt
| $6.99 |
| Fram BA3631 crankcase air filter
| $3.69 |
| 2-gal used air tank, 150 psi pop-off valve, 1/4" NPT female
quick disconnect, 1/4" NPT nipple, 1/4" NPT four-way cross manifold
| $30.00 |
| Subtotal
| $148.01 |
|---|
| Air Fittings |
|---|
| 15' of 1/4" rubber air hose, 1/4" NPT fittings
| $6.75 |
| 24" of 3/8" rubber air hose, 1/4" NPT fittings
| $8.99 |
| 25' x 1/4" spring-coil air hose, 1/4" NPT fittings
| $6.99 |
| 1/4" NPT check valve
| $12.95 |
| Square D Pumptrol Adjustable Pressure Switch, Class 9013 Type FHG12J27
(1/8" NPT fitting)
| $16.95 |
| 160 psi pressure gauge (1/4" NPT fitting)
| $4.69 |
| Air fitting combo kit (air chuck, blower and fittings, tire pressure
gauge, two hex nipples, female quick-disconnect fitting, six male
quick-disconnect fittings (two female-threaded, four male-threaded)
| $12.47 |
| Quick disconnect coupler (male and female ends)
| $4.49 |
| 1/4" NPT needle drain cock
| $1.85 |
| Two 1/4" NPT four-way cross manifolds
| $8.50 |
| 1/4" NPT street elbow
| $1.79 |
| Two 1/4" NPT hex nipples
| $1.50 |
| 1/4" NPT male to 1/8" NPT female hex bushing
| $0.73 |
| 1/4" male NPT to 1/2" hose barb
| $1.49 |
| 1/4" NPT square-head plug
| $0.25 |
| Two 1/4" NPT female pipe caps
| $2.70 |
| Subtotal
| $93.09 |
|---|
| Mounting Hardware |
|---|
| 1.5x1.5" metal corner brace
| $0.53 |
| 3x1" metal corner brace
| $0.49 |
| 6-32 machine screws (12 pack)
| $0.59 |
| 6-32 machine screws lock nuts (12 pack)
| $0.59 |
| 8" zip-ties
| $1.69 |
| Four each: 1/4" washers and lock washers
| $0.24 |
| Four 8M 1.25x20 bolts
| $2.18 |
| Four 8M washers
| $1.09 |
| Subtotal
| $7.40 |
|---|
| Electrical Stuff |
|---|
| Lighted 30A SPST rocker switch
| $2.29 |
| 15' (or so) of insulated 14-18 AWG wire
| already had |
| Miscellaneous electrical connectors bought in bulk
| nil |
| Subtotal
| $2.29 |
|---|
| Total
| $250.81 |
|---|
Contributors
Many people on the Net were a great help in completing this project.
Special thanks go out to
Darin Smith,
Jon Hylands,
Craig Myers, and
Matt Bateman
for their excellent web pages and helpful email.
Last modified Wednesday, 01-Dec-2010 09:19:06 MST
[
Jeep Tech Main Page |
Terry's Jeep Page
]
Copyright © 2001, 2000, 1999, 1998
JEEPTECH.COM
All Rights Reserved, All content with exception of private works and
corporate trademarked logos are property of Jeeptech.com
|


